Django for beginners

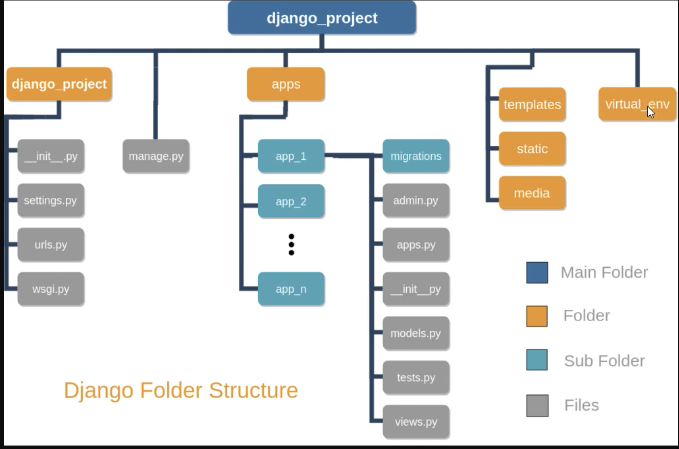
Django File System
- Django is primarily composed of two components that are projects and apps.
- A dynamic web application involves working with Internet protocols, web server configuration, and data retrieval or storage.
storage + user access + python + HTML + CSS
Hello World
deactivate # makes sure you are not in an existing venv

cd `<dir_for_project>`
mkdir `<project_name>`
cd `<project_name>`

python -m venv `<venv_name>`
source `<venv_name>/bin/activate` # venv should be activated
# (<project_dir>) $ >> # means venv is working.

pip install django # `<version>` can be specified
python -m django version # checks if it is installed

# Do not forget to add `.` at the end.
django-admin startproject `<project_name>` .

##
python manage.py migrate # It doesn't matter now, but it avoids the warnings. Normally, it migrates the changes in the db. Here, it created an SQLite database and migrated its built-in apps.
##
Now you have the following file structure:
├── `<project_name>` # use like `<project_name>.urls` to import anything inside.
│   ├── __init__.py
|   ├── asgi.py # is an entry point for ASGI-compatible web servers.
│   ├── settings.py # contains settings and configuration for the project.
│   ├── urls.py # is a table of contents of the site.
│   └── wsgi.py # is an entry point for WSGI-compatible web servers.
├── db.sqlite3 # python manage.py migrate
├── manage.py # interacts with the project.
└── `<venv_name>`/
export DJANGO_SETTINGS_MODULE=`<project_name>`.settings

python manage.py runserver # runs Django's local web server.
Go to http://127.0.0.1:8080/ in your browser.
- 8080 is the default value, which is changeable.
Ctrl+cquits the running server.
Create an app
- A project can contain multiple apps, where each app performs a single task.
- i.e. stock management, customer management, etc.
python manage.py startapp `<app_name>` # creates an app
- You need to configure the project to include the app. (
<project_name>/settings.py)
INSTALLED_APPS = [
    "django.contrib.admin",
    "django.contrib.auth",
    "django.contrib.contenttypes",
    "django.contrib.sessions",
    "django.contrib.messages",
    "django.contrib.staticfiles",
    "`<app_name>`",  # new
]
- An app can live anywhere on your
_Python path_. - Apps are pluggable so you can use an app in multiple projects.
Display a Hello World Page
# <app_name>/views.py
from django.http import HttpResponse

# The function name (here is "home") doesn't matter to be evaluated by Django.
def home(request):
    return HttpResponse("Hello world!")
# <project_name>/urls.py
# add path to your app
from django.contrib import admin
from django.urls import include, path

urlpatterns = [
    path('admin/', admin.site.urls),
    path('', include('`<app_name>`.urls')), # new
]
- Always add a name to urls.
# <app_name>/urls.py
# add path to index ''
from django.urls import path
from . import views

urlpatterns = [
    path('', views.home, name='home')
]
django-admin vs. manage.py
django-admin
django-adminis to deal with multiplesettingsfile.
manage.py
manage.pyis to deal with a singlesettingsfile.- It points to
settings.py. - It is specific to
venv. - It starts everything.
- You have to be in your projects folder to run it.
The Django MVT (model view template) pattern
user <=> django <=> url <=> view <=> model
                                 <=> template
The order, in which you create Templates, Views, and URLs, doesn’t matter since all work together closely.
1. Model manages data and core business logic.
2. View describes which data is sent to the user.
3. Template presents the data as HTML.
4. URL dispatcher is equivalent to the controller in the MVC architecture.
1. Model
- You can add a database to your project using the
<app_name>/models.pyfile. - Django creates a primary key automatically for each model, but you can also override this by specifying
primary_key=Truein one of your model fields. - The default primary key is an
idcolumn, which consists of an automatically incremented integer. - The Django object-relational mapper (ORM) is compatible with
MySQL,PostgreSQL,SQLite,Oracle, andMariaDB.- You can define the DB in
settings.py.
- You can define the DB in
from django.db import models

class <Model_name>(models.Model):
  <field_name> = models.CharField(max_length=200) # "models.CharField" can be any other type of field given below(1+).

  # optional
  def <function_name>(self):
    return ...

  def __str__(self):
    return self.<field_name>


class <Model_name>(models.Model):
  <field_name> = models.ForeignKey(<Model_name>, on_delete=models.CASCADE) # ForeignKey defines a relationship

  def __str__(self):
    return self.<field_name>
( Model Field Types (1+): AutoField, BigAutoField, BigIntegerField, BinaryField, BooleanField, CharField, DateField, DateTimeField, DecimalField, DurationField, EmailField, FileField, FilePathField, FloatField, ImageField, IntegerField, GenericIpAddressField, NullBooleanField, PositiveIntegerField, PositiveSmallIntegerField, SlugField, SmallIntegerField, TextField, TimeField, URLField, ForeignKey, ManyToManyField, OneToOneField. )
-
When you change something in your model, run
python manage.py makemigrations <app_name>to create migrations for those changes. -
python manage.py migrateapplies those changes to the database. It reads001_initial.py. It creates SQL commands and runs them. -
$ python manage.py shellis different than the UNIX shell. -
Note: If you get kind of messed up, you can remove
<file>.sqliteand run the migrations again.
2. View
-
Views determine what content is displayed on a given page.
-
There are three ways to write a view in Django:
- 1. Function-based view takes an
HttpRequestobject and returns anHttpResponseobject, both of which are defined in thedjango.httpmodule.- An instance of the
HttpRequestclass- All the data coming in.
- Data you see in your browser debugger about what data was sent to the server, that all ends up somewhere in this object.
- An instance of the
HttpResponseclass- Something that we create inside of our view. It might be simply text (HTML). (OR)
- You send it all back. It might be a redirect object, go to a different page.
- An instance of the
- 2. Class-based view allows for much greater code reusability and keeps things DRY (Don’t Repeat Yourself). It inherits from the
Viewclass. - 3. Generic class-based view handles common use cases, such as creating a new object, forms, list views, pagination, etc. They are built-in.
- 1. Function-based view takes an
-
Django request/response cycle:
URL -> View -> Model -> Template
# <app_name>/views.py
from django.http import HttpResponse

# When homePageView function is called, it returns "Hello World!"
def homePageView(request):
  return HttpResponse("Hello World!")
# <app_name>/urls.py
from django.urls import path

# We import our views.
# '.views' means views.py is in the current directory('.').
from .views import homePageView

# urlpattern has three parts:
# [
#   path = ( <a python regex for the empty string>,
#            <specify the view called homePageView>,
#            <add an optional URL name of 'home'>,
#          )
# ]
urlpatterns = [
  path = ('', homePageView, name='home'),
]
# <project_name>/urls.py
from django.contrib import admin
from django.urls import path, include

# When a user visits the homepage at "/" they will first be routed to the `<app_name>` and then to the homePageView view
urlpatterns = [
    path('admin/', admin.site.urls),
    path('', include('<app_name>.urls')),
]
URL Routing
- Django looks at the incoming request URL and uses
urls.pyto select a view. - The view from
views.py.- Handle incoming data in the request and copy it to the database through the model.
- Retrieve data to put on the page from the database through the model.
- Produce the HTML that will become the response and return it to the browser.
A view without any Python code
from django.views.generic import TemplateView

urlpatterns = [
  path('', TemplateView.as_view(template_name='views/main.html'))
]
A view with Python code
# urls.py
from django.urls import path

urlpatterns = [path('<func>', <app>.<func>)]
# views.py
from django.http import HttpResponse

def func(request):
    response = """<html><body><p>This is the funky function sample</p>
    <p>This sample code is available at
    <a href="https://github.com/csev/dj4e-samples">
    https://github.com/csev/dj4e-samples</a></p>
    </body></html>"""
    return HttpResponse(response)

# <website>/views/danger?guess=42
# <key>=<value>
def danger(request):
  response = """<html><body>
  <p>Your guess was """+request.GET['guess']+"""</p>
  </body></html>"""
  return HttpResponse(response)
Inside Django views and HTML escaping in Django
from django.utils.html import escape

def game(request):
  response = """<html><body>
  <p>Your guess was """+escape(request.GET['guess'])+"""</p>
  </body></html>"""
  return HttpResponse(response)
3. Template
Template = HTML + Django Template Language- Template is a way to generate HTML dynamically.
- It contains the static parts and describes how dynamic content will be inserted.
- It is a text file, which can generate any text-based format, such as
HTML,XML,CSV, etc. - It contains
variablesandtags. - If the template directory contains both
<project_name>and<app_name>, the templates will be available for all apps. - It is common to reuse the
<name>of a template in several applications.<app>/templates/<app>/<name>.html
{% load static %}loads the static template tags ofdjango.contrib.staticfilesapplication contained in theINSTALLED_APPSsetting.- You can include the static files, such as
blog.csswith{% static %}.
- You can include the static files, such as
URL -> View -> Template
# urls.py
path('game/<slug:guess>', views.GameView.as_view())
# views.py
from django.shortcuts import render
from django.views import View

class GameView(View):
  def get(self, request, guess):
    x = {'guess' : int(guess)}
    return render(request, 'tmpl/cond.html', x)

def loop(request):
  f = ['Apple', 'Orange']
  n = ['peanut', 'cashew']
  x = {'fruits' : f, 'nuts' : n, 'outer' : { 'inner': '42' } }
  return render(request, 'tmpl/cond.html', x)
<!-- tmpl/cond.html -->
<html>
<head>
  <title>A conditional template</title>
</head>
<body>
  <p>Your guess was {{ guess }}</p>
  {% if guess < 42 %}
    <p>Too low</p>
  {% if guess > 42 %}
    <p>Too high</p>
  {% else %}
    <p>Just right</p>
  {% endif %}
  <p>y: {{ outer.inner }}</p>
</body>
</html>
<!-- loop.html -->
<ul>
{% for x in fruits %}
<li>{{ x }}</li>
{% endfor %}
</ul>
{% if nuts %}
  <p>Number of nuts: {{ nuts|length }}</p>
{% else %}
  <p>No nuts.</p>
{% endif %}
Django Template Language (DTL)
## Template Tags/Code

# Substitution
{{ zap }}
{{ zap | safe }}

# Calling code
{% url 'cat-detail' cat.id %}
{% author.get_absolute_url %}

# Logic
{% if zap > 100 %}
{% endif %}

# Blocks
{% block content %}
{% endblock %}
# terminal
mkdir templates
<!-- templates/home.html -->
<h1>Homepage</h1>
# <project_name>/settings.py
# update the given line below
TEMPLATES = [
  {
    ...
    'DIRS': [os.path.join(BASE_DIR, 'templates')], # new
    ...
  },
]
# <app_name>/views.py
from django.views.generic import TemplateView

class HomePageView(TemplateView):
  template_name = 'home.html'
Adding pagination
- Pagination is a sequence of pages which are connected and have similar content. Splitting the list of posts across several pages, instead of a single page.
- You can define the number of posts per page.
- You have to create a template to display the paginator so that it can be included in any template that uses pagination.
Built-in template tags and filters
- Template tags take the from of
{% <template_tag> %}. - You can create your custom template tags.
- template tag:
{% tag %} - template variable:
{{ variable }} - template filter:
{{ variable|filter}}
Built-in tag reference
- Visit Django’s documentation
User authentication in Django
-
Django’s user authentication system handles
- user accounts
- groups
- permissions
- cookie-based user sessions
-
It handles both authentication and authorization.
- Authentication verifies a user is who they claim to be.
- Authorization determines what an authenticated user is allowed to do.
-
You can extend or substitute the default
Usermodel.
django.contrib.auth
User model
from django.contrib.auth.models import User
from django.contrib.auth import authenticate

user = User.objects.create_user('Bob', '[email protected]', 'password') # It is saved to the db.

existing_user = User.objects.get(username='Bob') # gets the user named Bob.
existing_.set_password('updated_password') # changes and saves.
existing_.save()

new_user = authenticate(username='Alice', password='password') # verifies a set of credentials.
if new_user is not None:
    # A backend authenticated the credentials
else:
    # No backend authenticated the credentials
Create a superuser
python manage.py createsuperuser --username=alice --email=[email protected]
Middleware in Django
- Middleware in Django is a set of functions that run during request and response processes.
- Each middleware component is responsible for a specific function.
- i.e.
AuthenticationMiddlewareassociates users with requests using sessions.
- i.e.
- Django ships with some built-in middleware, but you can also write your middleware.
How you activate middleware
- Add a middleware component to the
MIDDLEWARElist in your Djangosettings.pyto activate the middleware.
# settings.py
MIDDLEWARE = [
  # add here
]
- The order in
MIDDLEWAREmatters because a middleware can depend on other middleware.- i.e.
AuthenticationMiddlewarestores the authenticated user in the session so it must run afterSessionMiddleware.
- i.e.
TL;DR
Cross Site Forgery Protection (CSRF)
- A CSRF attack occurs when a malicious website contains a link, a form button or some JavaScript that is intended to perform some action on your website, using the credentials of a logged-in user who visits the malicious site in their browser.
- We see a notable example of this in many blogs that use Disqus as their commenting system. The user is required to first log in to Disqus to post a comment on it. This usage of a CDN is a legitimate instance of a cross-site request.
- The simplest CSRF attack is simply to trick a user into making a
GETrequest to a specific URL. It can be done by putting the URL into a deceptively named link. - A related login CSRF attack occurs when an attacking site tricks a user’s browser into logging into a site with someone else’s credentials.
Cross-Origin Resource Sharing (CORS)
- The single-page app model requires setting up CORS because the frontend and the backend run on separate domains.
- For more details
JSON Web Token (JWT)
- It securely transmits information between parties.
- Django uses JWTs for authentication and authorization.
- JWTs remove the need to understand CSRF.
- They are managed at the application level.
- Each application must implement storage, expiry and renewal of JWTs.
Dictionary
- Browser is the most familiar type of user agent.
- Host
- Hyperlink
- HyperText Transfer Protocol (HTTP)
- Internet
- IP Address
- IPv4
- IPv6
- Origin
- Protocol
- Server
- Simple Mail Transfer Protocol (SMTP)
- Transmission Control Protocol (TCP)
- Uniform Resource Locator (URL)
- Uniform Resource Identifier (URI)
- Uniform Resource Name (URN)
- User agent
- User Interface (UI)
- World Wide Web (WWW, W3, or the Web) is one of many applications built on top of the Internet.
- World Wide Web Consortium (W3C)